Hello, Cuban Redneck Nation. I hope this blog entry finds you well. It is April! Spring is here, which means it is planting season out here in Southwest Florida. Last year we barely tried and still manage to collect about $150 worth of crops from our raised planter boxes. What’s funny about that is that many people criticized it on social media when I posted the installation of two raised planter boxes, one measuring 35 inches by 70 and the second 35 inches square. Many city folks on Facebook were of the impression that it would take $100 to yield a $10 crop! Well, that was not the case, as I already stated.
Now, in 2021, there is a new host of critics making sarcastic comments. Some have gone as far as insinuating I am not honest about the assessed value of my projects. Folks, all I have to say is, enter my zip code 33948 onto the Lowe’s or Home Depot website, and you’ll see what I am paying for materials. While the cost of lumber has skyrocketed, it is not across the board. I love to use fence wood, also know as sometimes called fence boards or wood fence pickets. Why? Well, they are cheap. There is no line of contractors trying to get their hands on them. Therefore, they have not gone up in price as much as plywood, 2X4s, and other construction lumber.
The Benefits of Raised Bed Gardening
Raised garden boxes, sometimes called raised garden beds, are ideal for growing vegetables. They serve many purposes. They keep weeds, pets, as well as pests like slugs and snails away from your garden. If set up correctly, they provided better drainage. They also make maintenance a little bit easier by not having to bend down to a floor. Here in the coastal areas of Southwest Florida, they are almost a requirement. The soil here is very sandy and lacking nutrients – ideal for growing palms and coconut trees but not vegetables. When you talk about raised planter boxes, most people think of the floating type. In other words, a raised planter box with legs. The raised planter I will be building is more like beds, a containing wall that keeps our gardening soil from falling apart. Suppose you want to float them like a raised planter box. In that case, you will need to add four more boards as a floor, line it with weed fabric, and you are good to go!
Wood Raised Planter Beds Materials.
The first thing that I want to address is materials. As said before, I will be using fence wood, which may be a little controversial for those in the organic world since these are “treated.” But know that there are multiple grades of treated wood. The most common is UC3B and UC4B. The boards I am using on this project are UC3B which has the lowest amount of chemicals. UC4B is usually a darker olive green color and has a distinctive smell to them. For sure, a lot more expensive. Because of the design, the water flow of these planters is outwards. Meaning the flow of residue chemicals will be flowing away from the roots, not into the roots. Another hot topic is live expectation. These boards, although treat, are not meant for what is called “direct contact.” In other words, to be buried in the soil or direct contact with the ground. Although they may last north of a decade on a fence, my experience is that they will last 3-4 seasons when used as raised planter beds, and maybe five if used a raised planter box with legs. Given the cost and the potential of $3000 to $4000 worth of crops, I can live with that!
Making a Raised Planter Bed
To make a raised planter bed, you are going to need some basic tools. I often use my General International saw or my Harbor Freight miter saw, but know that a jigsaw or even a handsaw will do. If you are not into woodworking but would like to make a few things now and then, a jigsaw is the one tool I recommend.
As far as materials, you will need six – 6 X 72 X .625-inch fence boards and three 1.5 X 1.5 X 42-inch deck balusters. The balusters are going to get cut in half. Two of the fence board are going to get cut in thirds. The other four left as is. Although, I do recommend getting rid of the pointy end customary in wood fence pickets. I am using some 1.25-inch Right-Grip exteriors screws for fasteners just because I had them, but regular drywall will give 4-5 honest plating seasons. I also use some Tiedbond III glue. That is 100% optional, but it is worth the investment if it helps just a little.
Once you have all your pieces cut, the assembly is pretty straightforward. Fasten two of the shortboards to two of corner sticks. Don’t forget that these have to mirror each other. In other words, there is a left and a right-hand end cap. As to the centerpiece, I put boards on both sides, but I think one side should suffice. Besides, what am I going to do with the two leftover pieces? A lot of people ask why are the legs long if you are burying them? The long legs gt bury in the location of your plater, so it does not shift. Once you fill the raised planter bed with soil, it will be impossible to move. However, it may shift during the rainy season.
Once again, this is JC with the Cuban Redneck DIY channel, I look forward to having you as a subscriber, and I hope this project helps you achieve an awesome gardening season.
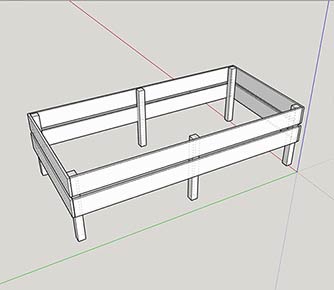
DIY Raised Planter Box Plans
I don’t usually make plans for my projects because, in my opinion, the exercise of making something from a picture or video is the most efficient way to learn woodworking. If you just cut and screw together pieces from a plan, your growth as a woodworker is severely impacted. But I do understand that many of my viewers, especially those into gardening, are not into woodworking, so, as per many requests, I have created and uploaded plants and printable instructions for the DIY raised planter box. In the publicly shared folder, you will also find the SketchUp file if you want to make additional changes to the design.
- Download the DIY Raised Planter Box Plans
TIP: A few subscribers have highlighted the fact that constant exposure to treated wood “may” (not a guarantee) increase the risk of lung, bladder, skin, and other cancers or other health effects. There are some engineering and physics factors to consider and analyze. For example, water flows downward, not up, but that is not here or there. Also, how crowded your raised planter is has a lot to do with it as well. With that said, one simple solution to get around this is to spray your raised beds with PLASTIC DIP. This is something I encorage and that have done to my raised beds. Plasti Dip is a synthetic coating that provides extra protection to both your raised beds by allowing them to last longer and to you by protecting you from any chemical leaking into your soils. Unlike other paints, PLASTIC DIP contains no heavy metals and is considered harmless when completely dry.
