Hello and welcome back to the Cuban Redneck website, where today we will be embarking on a new project concerning shade sail installation. The concept is not new. In fact, it is speculated that shade was provided at the Colosseum in Rome with large pieces of canvas. Very similar to what we now call shade sails! Hundreds of years before, the ancient Egyptians also use large pieces of fabric to provide shade in the hot Sahara desert. Today sun shade sails are quite sophisticated and made from UV and weather-resistant material to ensure many years of use.
With the back of my house facing the Gulf of Mexico, the afternoon sun between two and five PM can be unbearable. So much so that the outer wall in the back of the house gets hot and stays hot for hours after the sunset. Even with the argon-filled double pane glass door and windows, the kitchen and eating area in the back are getting a little too hot for comfort, and the main reason why I decided to install shade sails. Now, when it comes to choosing sun shade sail for the backyard, there’s an infinite number of choices and brands and shapes. There are also many sun shade sail post installation options and methodology and the reason for this shade sail installation video tutorial.
Sun Shade Sail & Pole Installation
I find that there is a lot of miss information about shade sail installation out there! Many people insist on using pole fence techniques or static load pole installation methods for a dynamic load. What do I mean? Your shade sail pole installation method has to handle the dynamic load presented by the wind. That means the pole has to hold a variable pull or load ranging from just the weight of the sun sail and how much power or tension it is required to maintain it stretched and a 10-MPH or 30-MPH wind gust! Something else to take into consideration is that in Florida or anywhere you are subject to tropical storms, hurricanes, and or cyclones, you need to be able to take it down at a moment’s notice!
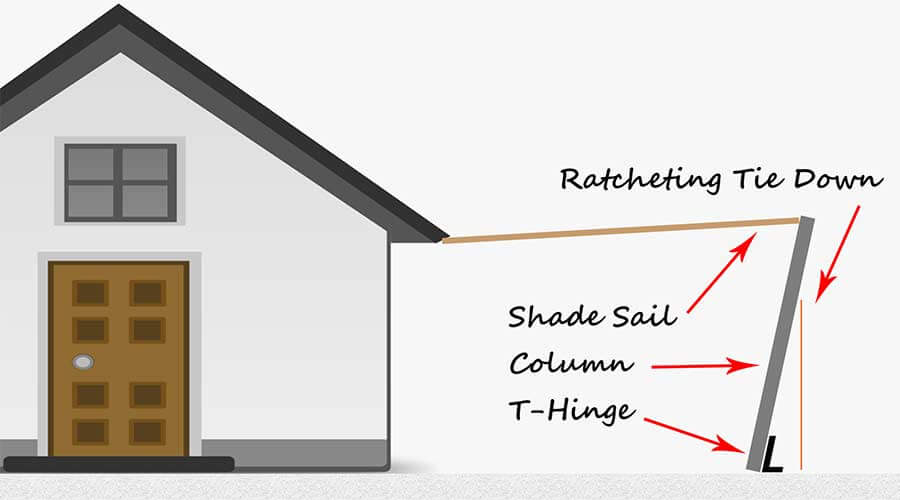
My solution for this dilemma was to engineer a flexible and adjustable shade sail pole. Rather than burying the pole on the ground and having to compensate for whatever amount of force it is presented on it, I decided to make it flexible. That way, I can adjust the tension and bring it down in case of a storm. But most importantly, have it serve as a fuse to minimize damage to the house. In case of a tornado or any unforeseen bad weather phenomenon while we are away.
Shade Sail Pole Installation & Design

The engineering of this shade sail pole design is quite simple and not my design by any means. The same or similar concept is often found on military tents and or canopies. It consists of a pole used at the corners to leverage the tension required to keep the tent tight. I simply adjusted the materials to suit my needs.
The pole or column consists of two eight-foot treated lumber 2X4, which I have aligned in opposite directions to create a composite 4X4. Not only are two 2X4 cheaper than a 4X4, but having aligned the grain in a different direction makes for a stronger pole! To join the two, I used LiquidNail and 2.75″ coarse-thread screws. I let the assembly dry for a day and then painted it with outdoor paint to match the house’s color. The rache strap I got from Harbor Freight just because they were on sale, but you can find them anywhere. In fact, a day or so after I purchase them, I saw them on Amazon for a couple of dollars less. The hinges are what is called a barn hinge. They are the 12″ type and came from Harbor Freight as well.
I will not get too caught up with the installation procedure because it is improbable that your installation is anything like mine. But all I did was cast a small anchoring platform with Quikrete 80 lb – concrete Mix measuring 10 X 18 X36 inches deep. If you have a deck or cement slab, more than likely, this will not be necessary! But I said earlier I have future plans in mind! With the mounting place determined, I mounted the barn hinge at the end of the pole along with two eye bolts. One away from the house at about the 6-foot mark for the ratchet strap and the second at the 8-foot mark for the shade sail. I used a combination of turnbuckles and D-Ring anchors for the square sail on the house side, and for the triangular ones, I used eye bolts. The location where my eye bolts needed to be, did not match the trusses in the roof. What I did was make a bridge with 2×4 and roofing straps between two trusses.
Choosing a Shade Sail For Your Backyard
When you start the process and go to Google searching for something like “shade sail for backyard,” the number of choices can be overwhelming. Shade sail comes in multiple sizes, colors, sizes, and prices. I don’t expect mine to be up for more than a year or since I am looking to build an aluminum structure to hold the about 20 solar panels soon. From my experience, and I have had these installations on several properties, you need to stay flexible regarding color and size. Some s 1 foot too short or long can mean a $100 difference! I think that standard (massed produces) sizes are 9, 12, and 16. For some apparent reason, everything in between is just crazy money. It would help if you remembered that shade sails are not perfectly square, triangular, or rectangular when choosing the size. Also, they are not perfect size. They can vary up to 6-inches from one to the next from the same manufacturer, even if they are the same part number. When fully stretch, the shade sails are usually about 1-foot per side shorter in coverage than the size advertised. That is why you often see them overlap. Shade sails will allow water to go through, although they may sag a little under heavy rain. And even the cheap Chinese “nylon” units seem to last years under the Florida sun.
I hope this video and post were informative enough to get you going with your shade sail installation but feel free to comment on the YouTube channel, FaceBook, and by using the contact form at the link below!


